How to Set Up Your Online Music Teaching Studio
The largest jump in online lesson quality does not come from a better camera. It comes from clean audio, a treated room, and a workflow that removes friction between you and the student. Video tells the student what you look like. Audio tells them what the music actually sounds like, and music is the thing you are paid to teach. This guide is for teachers building a serious remote practice, the kind that justifies real gear because it runs many lessons a week for years. If you teach one student occasionally from a laptop, you can skip almost all of it. If you are moving your studio online for good, read on.
The Space You Actually Need
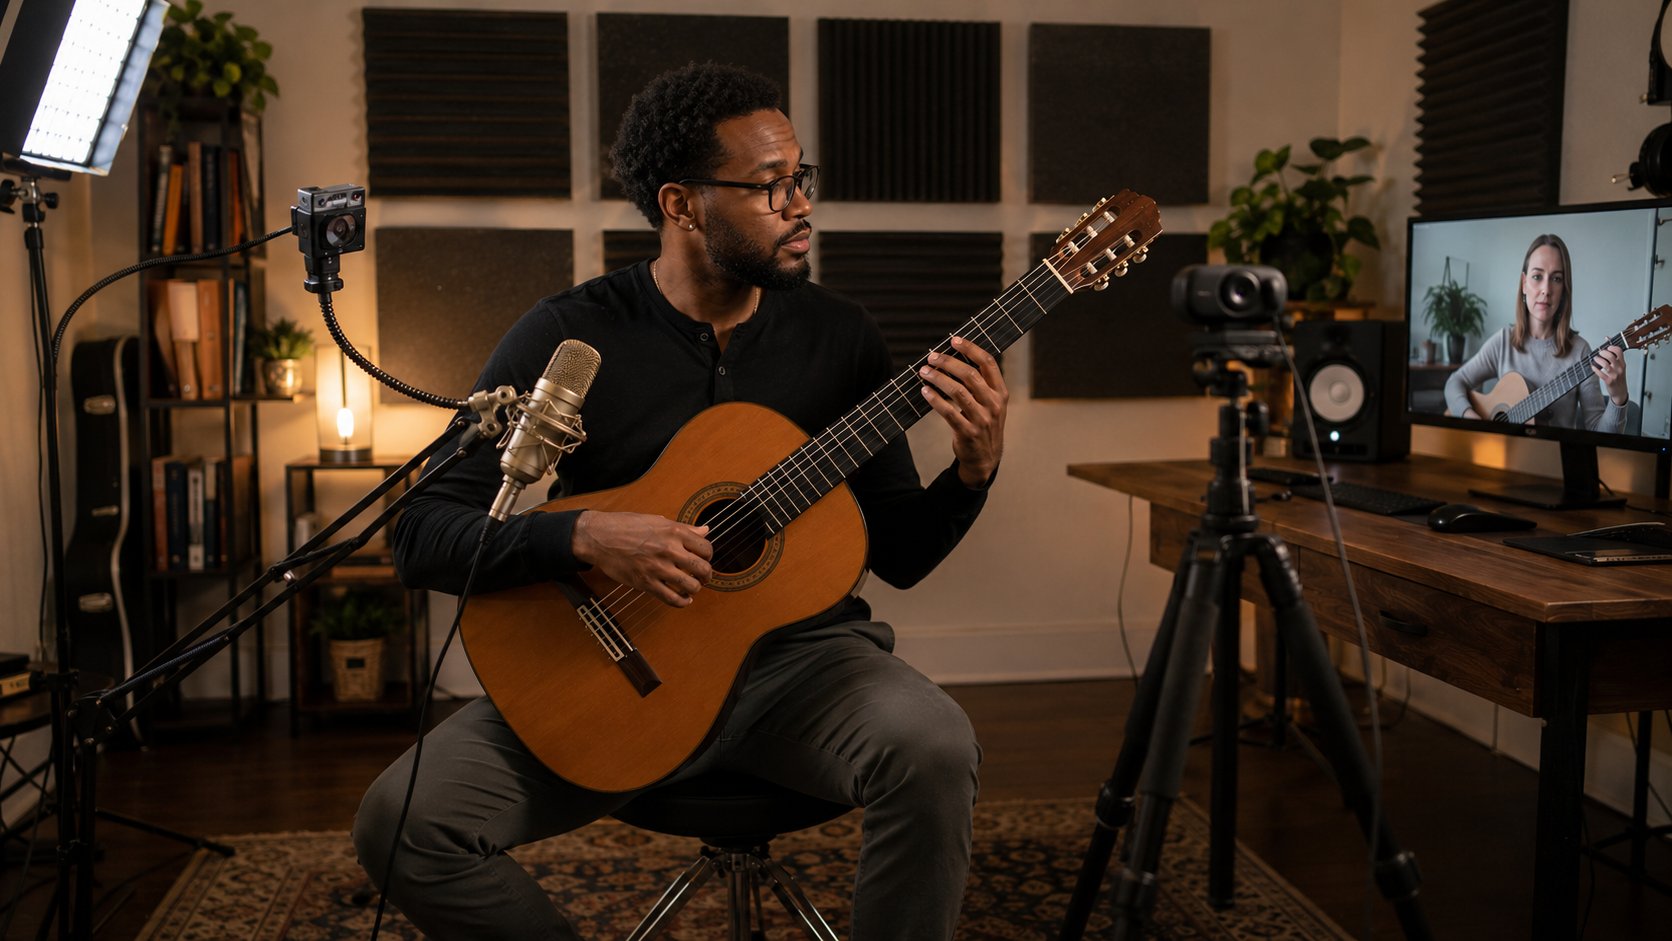
You do not need a dedicated room, though a door you can close is the single biggest quality-of-life upgrade available. What you need is a fixed location with fixed gear that you can sit down at and start teaching in under a minute. Consistency beats square footage. A treated corner of a bedroom that sounds the same every lesson outperforms a beautiful room you reconfigure each time.
Three non-negotiables: a wired internet drop, ambient quiet (no HVAC roar, no traffic, no dishwasher next door), and enough room to keep your instrument, a camera, and yourself in frame without rearranging furniture. Everything else is optimization on top of those three.
Signal Chain: USB Mic vs. Audio Interface
This is the decision that determines your ceiling, so understand the two paths before spending anything.
A USB microphone is a complete recording system in one body. It contains the capsule, the preamp, and the analog-to-digital converter, and it plugs straight into your computer. Examples in the useful range, as of 2026: Audio-Technica AT2020USB-X (around 130 to 170 dollars), Rode NT-USB+ (around 160 to 190), Shure MV7+ (around 280), which also has an XLR output so it grows with you. For most teachers, a single good USB mic is the right answer. It is simpler, it has fewer failure points, and the audio is dramatically better than any built-in laptop mic.
An audio interface plus an XLR microphone is the upgrade path when you want to use professional mics, run more than one input, or get lower monitoring latency, meaning the delay in what you hear in your own headphones. The interface is the box that holds the preamp and converter; the mic is just a transducer that needs that external preamp. A Focusrite Scarlett Solo or 2i2 (around 120 to 200) paired with an XLR mic gives you cleaner gain, real headphone monitoring, and room to add a second mic later. The cost is one more device, one more cable, and one more thing to configure. Do not go this route for the prestige of XLR alone. A 130-dollar USB mic placed correctly beats a 400-dollar XLR mic placed badly through a noisy interface.
Nothing you buy shortens the round trip of the call itself. That delay is set by the network and the platform, and it sits far above the threshold at which two players can stay together, so playing along with a student in real time is off the table on any normal video call. Dedicated low-latency tools for remote ensemble playing are the narrow exception, and they need wired connections at both ends and a short hop between you.
Condenser mics (most USB mics, the AT2020 family) are sensitive and capture room sound, so they punish an untreated space. Dynamic mics (Shure SM58, SM7B, MV7 and MV7+) reject the room and ambient noise far better, which is why they forgive a bad-sounding space. The MV7 and MV7+ use a dynamic cartridge throughout, so there is no mode to switch into: you get that rejection by default, over USB or XLR. If your room is live and you cannot treat it yet, a dynamic mic is the smarter buy.
Gain Staging and Mic Placement
Gear placed and set correctly is what separates clean audio from amateur audio.
Set your gain so peaks land around -12 to -6 dBFS, never touching 0. Speak and play at your loudest realistic lesson volume while watching the input meter. If it slams the top and clips, you get a permanent crunch no software can fix. If it sits near the floor, you raise the noise when you boost it later. Turn the mic gain up until your loudest playing peaks comfortably below the top, then leave it.
Distance and angle matter more than the mic model. For speech and most instruments, sit roughly a hand-span (6 to 10 inches) off a condenser, slightly off-axis so plosives and breath do not punch the capsule directly. Closer gives you more low-end “proximity effect” and more presence; farther captures more room. For an acoustic instrument, point the mic at the part of the instrument that actually sounds good, not at the soundhole of a guitar (boomy) but a few inches toward the 12th fret, or toward the body of a violin rather than straight down the f-hole.
Know your polar pattern. A cardioid pattern (the default and the right choice for solo teaching) picks up what is in front and rejects what is behind, so point the rejection at your noise source. Omnidirectional captures everything around it; avoid it unless you are deliberately recording a room. The Blue Yeti is popular and fine, but teachers routinely leave it in the wrong pattern and aim it at the wrong face. Speak into the front (the side with the logo, the mute button and the headphone volume knob), set to cardioid. The gain knob and the pattern selector live on the back, and the headphone and USB jacks are underneath the body, so none of those faces is the one to sing or play into.
44.1 or 48 kHz at 24-bit is correct and more than enough; higher sample rates do nothing audible for a lesson and only burden your CPU and bandwidth.
Platform Audio Settings That Actually Change the Sound
Default video-call audio is tuned for speech and actively destroys music. It applies noise suppression, automatic gain control, and echo cancellation that interpret a sustained note or a soft passage as noise and gate it, pump it, or smear it.
The fix is to disable that processing. In Zoom, select the Original Sound for Musicians audio profile, which turns off the noise suppression and AGC. Selecting the profile is not the whole job. Inside it, tick High fidelity music mode, and tick Stereo audio as well if your microphone supports it. Then, at the start of every lesson, confirm the in-meeting Original Sound for Musicians control is switched on, because it does not reliably carry over from one meeting to the next. The full walkthrough is in this guide to Zoom audio settings for music lessons. Google Meet has no music mode at all, so there is no equivalent setting to turn on. The only audio lever there is the noise-cancellation toggle, which appears only on paid Google Workspace and Google One plans, and switching it off is the most you can do. For anything where tone and dynamics matter, Zoom with Original Sound for Musicians is the platform to recommend. Whatever the platform, the principle is identical: turn off voice-optimized processing so the student hears dynamics, sustain, and tone instead of an algorithm’s guess at them. This one toggle changes lesson quality more than any single piece of gear.
Acoustic Treatment in Plain Language
Treatment changes how your room sounds into the microphone. It is not soundproofing, which blocks sound from passing through walls and is a different, expensive construction problem. Treatment tames the reflections that make audio sound boxy, hollow, or echoey.
Soft and irregular surfaces absorb and scatter; hard flat surfaces reflect. A bare room with hardwood, drywall, and a window wall is acoustically hostile. A rug, curtains, a stuffed bookshelf, and a soft chair already help before you buy anything.
Treat the first reflection points first. These are the spots on the walls, ceiling, and floor where sound travels from you, bounces once, and arrives at the mic slightly delayed, which is what creates the smeared, roomy character. Find them by clapping once and listening for where the space rings, or have someone slide a mirror along the side wall until you see the mic in it from your playing position; that mirror spot is a first reflection point. Hang a panel there.
Use real broadband absorption, not thin foam. The cheap egg-crate foam squares only absorb the highest frequencies and leave the muddy mids and lows untouched, which can make a room sound worse and more unbalanced. Buy or build 2-inch to 4-inch thick rigid mineral-wool or fiberglass panels (Owens Corning 703-style). Built yourself from a box of mineral wool, some fabric and a simple timber frame, two to four panels at first reflection points plus a rug transforms a small room for well under 200 dollars. Bought ready-made, panels of that thickness run roughly 60 to 100 dollars each as of 2026, so the same treatment lands nearer 150 to 500 dollars depending on whether you hang two panels or four and on what you spend on the rug.
Bass traps go in the corners. Low frequencies pile up where walls meet. Thick corner traps, or simply a stack of absorption straddling a corner, control the boom. This matters most for low instruments (cello, bass, low piano, baritone voice) and least for, say, violin or flute.
You do not need a perfectly dead room. You need to kill the slap and ring. Stop when a clap sounds dry and your recorded voice sounds like you in a normal room, not in a stairwell.
Camera Placement, Lighting, and a Hands Cam
Video does not teach the music, but bad video quietly erodes the relationship, so get the cheap wins. A deeper treatment lives in this guide to the best video setup for online lessons; the essentials follow.
Put the lens at or just above eye level. A laptop on a desk shoots up your nose and points your gaze downward, which reads as disengaged. Raise the machine on a stand or books, or mount an external webcam (a Logitech C920-class 1080p camera, around 60 to 80 dollars, is plenty) at face height.
Run a second hands cam for any instrument where the hands are the lesson. Piano, guitar, strings, and percussion all benefit from a dedicated overhead or side angle on the hands that you switch to during demonstrations. A cheap second webcam clamped on an arm, or a phone running a webcam app, plugs into the same call; most platforms let you swap which camera you share mid-lesson. Being able to show a fingering from above instead of describing it saves minutes every lesson.
Light from the front, softly. A window or lamp behind you turns your face into a silhouette. Put your key light in front and slightly to one side, then a weaker fill on the other side to soften the shadow it casts. Soft and diffused (a panel or softbox, even a ring light) beats a bare overhead bulb. Keep color temperature consistent, ideally daylight-balanced around 5000 to 5600K across all your lights, so you do not end up half-orange and half-blue. Within the video budget, lighting buys more than extra resolution does.
Bandwidth and the Wired Connection
Wired Ethernet is the most underrated upgrade in this entire article. Wi-Fi is variable by nature: it shares the channel with neighbors, drops packets through walls, and renegotiates speed without warning, which is what produces the mid-lesson freeze and the robotic audio. A direct Ethernet cable to the router removes that whole class of problem. If the router is far away, a powerline adapter or a single well-placed mesh node beats raw Wi-Fi.
A single high-quality lesson stream needs only a few megabits up and down, so raw speed is rarely the issue. Stability and low jitter are. Run a wired connection, close bandwidth hogs (cloud backups, large downloads, other streamers in the house), and your audio holds together even when the picture occasionally softens.
The Between-Lessons Workflow
The studio is also how you run the work, and a tight workflow is what makes a full teaching week sustainable rather than exhausting.
- Use a repeatable lesson skeleton. A consistent shape (warm-up, technique, repertoire, then something new or free) means students arrive knowing the rhythm and you spend zero energy deciding what comes next. Structure is also what drives engagement with online students, who disengage faster when a lesson wanders.
- Keep one shared folder per student. A single cloud folder or doc per student holding assignments, recordings, and sheet music gives both of you continuity between weeks. It also dovetails with how students take and keep their own lesson notes, so nobody re-litigates last week.
- Leave a 5-minute buffer between lessons. Back-to-back booking guarantees that one tech hiccup makes you late for the next student all day. The buffer absorbs reconnects, swallows note-writing, and gives you a breath.
- Write the practice note inside that buffer, not “later.” Two lines on what you covered and what to practice, sent before the next student joins, while it is fresh. Later never comes.
- Audit the rig quarterly. Fifteen minutes every three months: reseat cables, confirm the mic gain, re-lock webcam focus, and run a test call. Drift is silent until a student points it out.
A serious studio is a multi-year asset. The same panels, mic, and interface run thousands of lessons, so the up-front spend amortizes to pennies per lesson and pays back fast once you treat it as the infrastructure of a real income rather than a hobby cost. If you want the math on that, see how teachers build a sustainable online teaching income and how the gear factors into lesson pricing.
What Matters Less Than You Think
- Resolution above 1080p. A 4K webcam shows the student a sharper version of your face and changes nothing about the music. Spend that money on audio.
- Flagship-priced microphones. A 1,500-dollar Neumann does not survive video compression intact and will not be heard as better through a laptop speaker. Above a competent mid-priced mic the call is the bottleneck rather than the capsule, so the extra money buys nothing the student can hear.
- Green screens and virtual backgrounds. A real, tidy background with a bookshelf or a plant looks more professional than any keyed background, and it does not chew your CPU or eat your edges.
- A top-tier computer. Any current laptop handles a teaching call. The processing budget goes to the network and the audio chain, not the silicon.
How Tunelark Vets Its Teachers, and Why It Matters for You
Every Tunelark teacher is vetted by working musicians and educators for teaching quality before they can list. That matters to you as much as it does to students: because the roster stays selective, each accepted teacher sees more of the incoming demand instead of competing with hundreds of profiles for the same inquiry. The detail of what we look for lives on the teach with Tunelark page.
What Students Notice About a Studio That Is Not the Gear
Neel S. says students look at the instruments in his room and start asking whether they should be learning something else, whether there is a better instrument for them, whether they could try one. He encourages it and will give half a lesson to the basics of another instrument. One student who started on voice found he was more drawn to piano, and wanted guitar so he could accompany himself around a campfire. A room that reads as a working musician’s room invites that conversation, and the conversation is what keeps a student.
How to Become a Music Teacher on Tunelark
Tunelark does not specify your gear. Students browse Find-a-Teacher and choose for themselves, and the intro and performance video your room produces is a large part of what they judge.
1. Apply to teach and submit a short profile.
2. Share a brief introduction along with a sample of your playing and your teaching.
3. Our team of experienced musicians and teachers reviews applications and follows up with teachers who meet the bar. We keep the roster selective on purpose.
4. Once you’re approved, you set your own rates, availability, and lesson approach, and we handle scheduling, billing, payments, and student discovery around you.
Tunelark works best for experienced teachers who care about long-term student relationships and want a platform that respects both their time and their craft.
Frequently Asked Questions
What single upgrade improves my lessons the most?
Replacing your built-in laptop microphone with a good USB mic, then enabling your platform’s music mode (Zoom’s “Original Sound for Musicians” or the equivalent) so the call stops processing your audio. Together those two changes do more than any camera, light, or treatment panel, because the student hears the actual music instead of a voice-optimized approximation of it.
Do I need an audio interface, or is a USB mic enough?
A USB mic is enough for almost every solo teacher. An interface plus an XLR mic is worth it only when you want to run multiple inputs, use professional mics, or get lower monitoring latency. If you are unsure which side of that line you are on, the tell is whether you have ever needed two live microphones in the same lesson. If you have not, an interface is not the next purchase to make.
Is acoustic foam worth buying?
Not for a teaching room. Thin foam works only at the top of the frequency range, and what makes a small room sound boxy sits lower down than that. If you can fix things to the wall, the acoustic treatment section above tells you what to buy instead and where to put it. If you rent and cannot hang anything, you can still get most of the way there without hardware: teach in the softest room you have, pull a heavy curtain across the wall behind the microphone, put a rug on the floor, and work a little closer to the mic so more of what it hears is you and less of it is the room.
Why does my music sound choppy or muffled on video calls even with a good mic?
Two different causes produce two different symptoms and need two different fixes. Muffled, pumping or gated notes come from speech processing, which the platform audio section above tells you how to switch off. Choppy audio with dropouts and robotic artifacts is a network problem, and it is almost always Wi-Fi: a shared channel, dropped packets, and speed renegotiation the call cannot recover from. Run an Ethernet cable to the router and close anything else using the connection. If the sound is bad in both ways at once, fix the network first, because you cannot judge an audio chain over an unstable link.
How much should I budget to set up a serious online studio?
A solid starter setup (good USB mic, a 1080p webcam, a soft light, and an Ethernet cable) runs roughly 250 to 400 dollars as of 2026 and covers most of what students perceive. Adding broadband treatment, a second hands cam, and better lighting brings a strong studio to roughly 600 to 1,200 dollars total. It is durable, multi-year infrastructure, so it amortizes to a small per-lesson cost across a busy teaching week.
Keep reading
About Jennifer Heath
I'm Jennifer Heath, VP of Operations at Tunelark and a lifelong singer. I joined the company in 2020 and oversee much of what makes Tunelark work for students and teachers: hiring, training and supporting our instructors, student support, marketing and day-to-day operations. I started voice lessons at 7 and sang with touring choirs through my teens. Music belongs in every life, for the self-expression, the discipline, the comfort and the simple joy of it.